Step-by-Step Tutorial for Easy Face Recognition with Python
Nov 21, 2023
Nov 21, 2023
Nov 21, 2023


Introduction:
Hey there, fellow engineers! Welcome to Week 3 of our journey. This time, we're diving deep into the world of face recognition using Python. Ever wondered how to build your own face recognition model? Look no further – we've got a straightforward guide to get you started in no time! 🚀
Watch the Demo: Face Recognition in Action
Setting up the Environment:
Before we jump into the code, let's set up our environment. We'll need a few Python libraries to work with images and face recognition. Open up your terminal and run these commands:
!pip install numpy opencv-python
!pip install dlib
!pip install face_recognition
We're installing NumPy and OpenCVfor image processing, Dlib for machine learning and facial landmark detection, and face_recognition for, well, face recognition!
Coding the Magic:
Now, let's dive into the code. We'll start by loading an image and preparing it for analysis:
import cv2
import numpy as np
import os

path = "/content/train/"
known_names = []
known_name_encodings = []
images = os.listdir(path)
In these lines, we set up our directory, create empty lists for known names and encodings, and fetch our training images.
Facial Analysis:
Using the fantastic face_recognition library, we'll find faces in the images and extract their unique features:
for _ in images:
    image = fr.load_image_file(path + _)
    image_path = path + _
    encoding = fr.face_encodings(image)[0]

    known_name_encodings.append(encoding)

    known_names.append(os.path.splitext(os.path.basename(image_path))[0].capitalize())
Here, we iterate through our images, compute facial encodings, and store them. We also capitalize the image names and store it in known_names for identification.
test_image = "/content/test/test.JPG"
image = cv2.imread(test_image)
Next, we use OpenCV cv2 to read and load the image from the specified file path.
image = fr.load_image_file(test_image)

# Obtain face locations
face_locations = fr.face_locations(image)

 # Obtain face encodings
face_encodings = fr.face_encodings(image, face_locations)
These lines use face_recognition fr to load the image, detect face locations within the image, and obtain corresponding face encodings for further analysis.
Recognition and Association:
Time to match faces! We compare the encodings with our database to recognize people:
for (top, right, bottom, left), face_encoding in zip(face_locations, face_encodings):
    matches = fr.compare_faces(known_name_encodings, face_encoding)
    name = ""
    face_distances = fr.face_distance(known_name_encodings, face_encoding)
    best_match = np.argmin(face_distances)
    if matches[best_match]:
        name = known_names[best_match]
    cv2.rectangle(image, (left, top), (right, bottom), (0, 0, 255), 2)
    cv2.rectangle(image, (left, bottom - 15), (right, bottom), (0, 0, 255), cv2.FILLED)
    font = cv2.FONT_HERSHEY_DUPLEX
    cv2.putText(image, name, (left + 6, bottom - 6), font, 1.0, (255, 255, 255), 1)
These lines do the heavy lifting – recognizing faces, drawing rectangles around them, and displaying names.
Visual Representation:
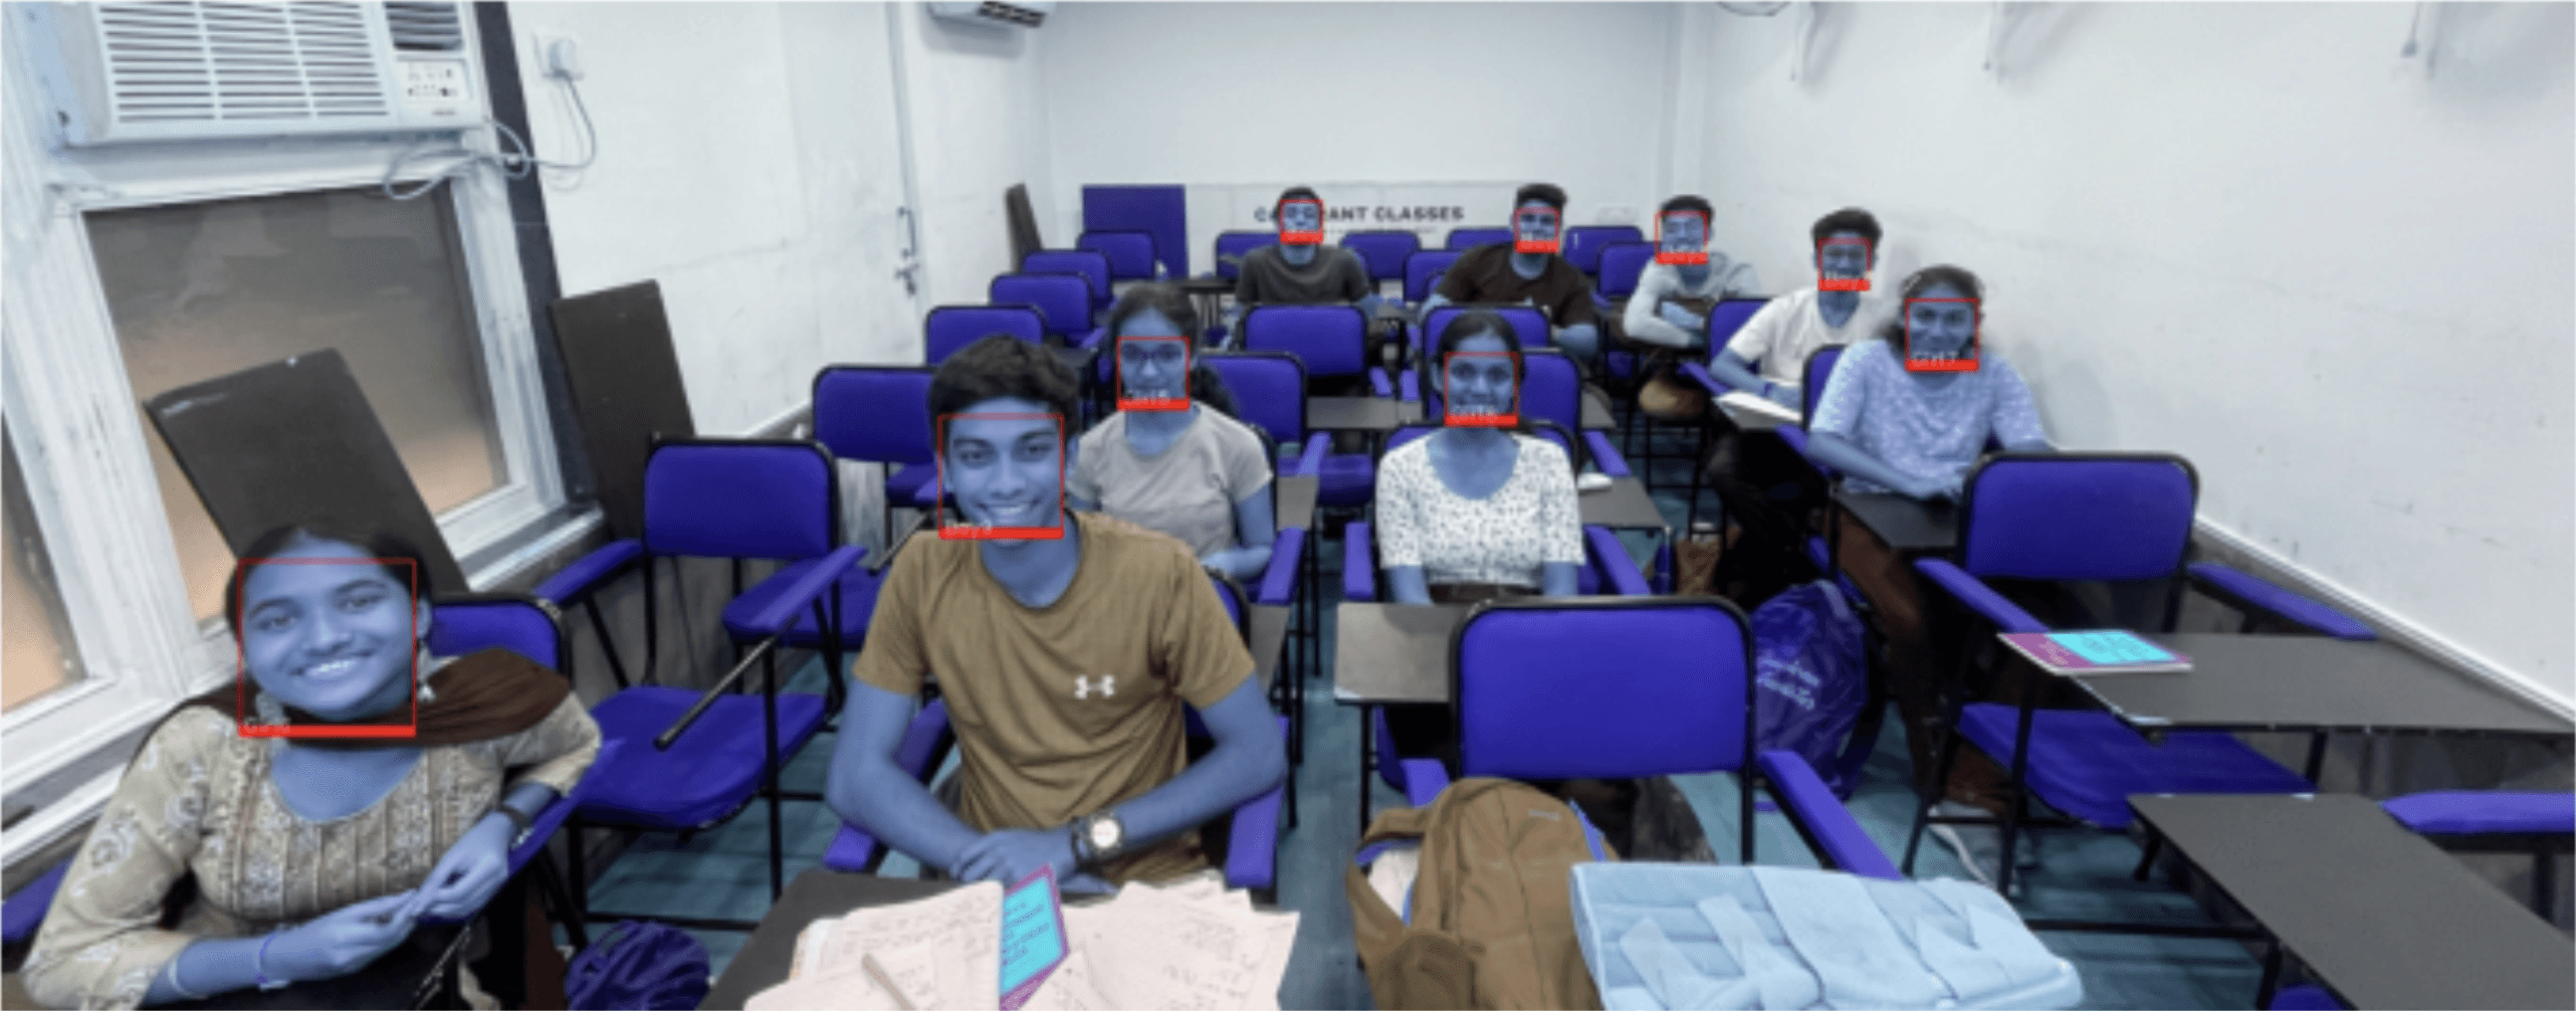
To provide a clear visual representation of the recognition results, the code highlights detected faces by drawing bounding rectangles and overlays the predicted names, ensuring a comprehensive and informative output.
from google.colab.patches import cv2_imshowThis line imports the cv2_imshow function from google.colab.patches to display images using OpenCV in a Colab notebook.
cv2_imshow(image)
Hooray! We have achieved a good accuracy with the face recognition model, all students were classified correctly in the above image. And we've accomplished this swiftly ⚡️
Summarizing the Entire Code:
Now, let's review the entire code in action. It harnesses the power of our face recognition model to identify and predict individuals in images. The process begins with image loading, followed by the extraction of face locations and encodings. For each face, our code conducts a meticulous comparison of face encodings with known ones, ultimately determining the closest match based on the smallest face distance. When a match is detected, a prominent rectangle elegantly frames the recognized face, and the predicted name appears above it, courtesy of OpenCV's versatile drawing functions.
Challenges and Solutions:
But it wasn't all smooth sailing. We faced challenges like detecting multiple students in one shot. So, we introduced a confidence threshold and got creative with our data structure to ensure accurate recognition.
Conclusion:
In just one week, we've explored advanced face recognition models, fine-tuned data pipelines, and found ingenious solutions to complex problems. Stay tuned for more exciting developments in the world of facial recognition!
Introduction:
Hey there, fellow engineers! Welcome to Week 3 of our journey. This time, we're diving deep into the world of face recognition using Python. Ever wondered how to build your own face recognition model? Look no further – we've got a straightforward guide to get you started in no time! 🚀
Watch the Demo: Face Recognition in Action
Setting up the Environment:
Before we jump into the code, let's set up our environment. We'll need a few Python libraries to work with images and face recognition. Open up your terminal and run these commands:
!pip install numpy opencv-python
!pip install dlib
!pip install face_recognition
We're installing NumPy and OpenCVfor image processing, Dlib for machine learning and facial landmark detection, and face_recognition for, well, face recognition!
Coding the Magic:
Now, let's dive into the code. We'll start by loading an image and preparing it for analysis:
import cv2
import numpy as np
import os

path = "/content/train/"
known_names = []
known_name_encodings = []
images = os.listdir(path)
In these lines, we set up our directory, create empty lists for known names and encodings, and fetch our training images.
Facial Analysis:
Using the fantastic face_recognition library, we'll find faces in the images and extract their unique features:
for _ in images:
    image = fr.load_image_file(path + _)
    image_path = path + _
    encoding = fr.face_encodings(image)[0]

    known_name_encodings.append(encoding)

    known_names.append(os.path.splitext(os.path.basename(image_path))[0].capitalize())
Here, we iterate through our images, compute facial encodings, and store them. We also capitalize the image names and store it in known_names for identification.
test_image = "/content/test/test.JPG"
image = cv2.imread(test_image)
Next, we use OpenCV cv2 to read and load the image from the specified file path.
image = fr.load_image_file(test_image)

# Obtain face locations
face_locations = fr.face_locations(image)

 # Obtain face encodings
face_encodings = fr.face_encodings(image, face_locations)
These lines use face_recognition fr to load the image, detect face locations within the image, and obtain corresponding face encodings for further analysis.
Recognition and Association:
Time to match faces! We compare the encodings with our database to recognize people:
for (top, right, bottom, left), face_encoding in zip(face_locations, face_encodings):
    matches = fr.compare_faces(known_name_encodings, face_encoding)
    name = ""
    face_distances = fr.face_distance(known_name_encodings, face_encoding)
    best_match = np.argmin(face_distances)
    if matches[best_match]:
        name = known_names[best_match]
    cv2.rectangle(image, (left, top), (right, bottom), (0, 0, 255), 2)
    cv2.rectangle(image, (left, bottom - 15), (right, bottom), (0, 0, 255), cv2.FILLED)
    font = cv2.FONT_HERSHEY_DUPLEX
    cv2.putText(image, name, (left + 6, bottom - 6), font, 1.0, (255, 255, 255), 1)
These lines do the heavy lifting – recognizing faces, drawing rectangles around them, and displaying names.
Visual Representation:
To provide a clear visual representation of the recognition results, the code highlights detected faces by drawing bounding rectangles and overlays the predicted names, ensuring a comprehensive and informative output.
from google.colab.patches import cv2_imshowThis line imports the cv2_imshow function from google.colab.patches to display images using OpenCV in a Colab notebook.
cv2_imshow(image)
Hooray! We have achieved a good accuracy with the face recognition model, all students were classified correctly in the above image. And we've accomplished this swiftly ⚡️
Summarizing the Entire Code:
Now, let's review the entire code in action. It harnesses the power of our face recognition model to identify and predict individuals in images. The process begins with image loading, followed by the extraction of face locations and encodings. For each face, our code conducts a meticulous comparison of face encodings with known ones, ultimately determining the closest match based on the smallest face distance. When a match is detected, a prominent rectangle elegantly frames the recognized face, and the predicted name appears above it, courtesy of OpenCV's versatile drawing functions.
Challenges and Solutions:
But it wasn't all smooth sailing. We faced challenges like detecting multiple students in one shot. So, we introduced a confidence threshold and got creative with our data structure to ensure accurate recognition.
Conclusion:
In just one week, we've explored advanced face recognition models, fine-tuned data pipelines, and found ingenious solutions to complex problems. Stay tuned for more exciting developments in the world of facial recognition!